
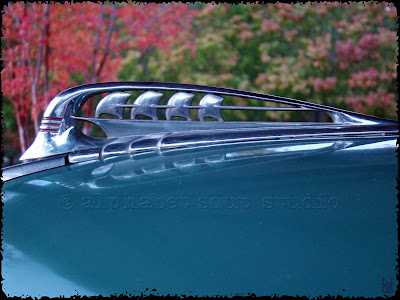
Example One:
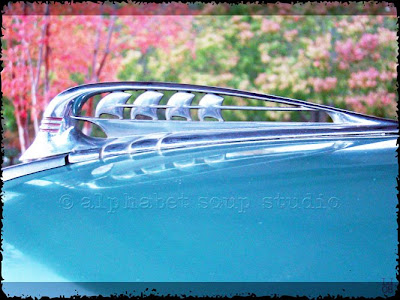
Example Two:
Okay kiddies, gather round. Auntie Lennie just learned something new. Today. And in the spirit of sharing, I am going to let you in on this nifty tip I discovered. Of course, there is the possibility I am the only known person who didn't already know this information. Wouldn't surprise me. I've been last in the loop before.
So here goes. Have you ever had your digital photos developed, only to curse at the developer because they cut off the top and bottom of your photo? Just a little bit, but enough to make you p.o.'ed? I have. Black's Cameras, I officially owe you an apology and here it is. I'm sorry I called you a bunch of incompetent losers. I'm sorry I swore I'd never let you develop my photos again. Because, as it turns out, you were not at fault. You were at fault for short-changing me by one photo on my last order, but I'm over that now.
So here goes. Have you ever had your digital photos developed, only to curse at the developer because they cut off the top and bottom of your photo? Just a little bit, but enough to make you p.o.'ed? I have. Black's Cameras, I officially owe you an apology and here it is. I'm sorry I called you a bunch of incompetent losers. I'm sorry I swore I'd never let you develop my photos again. Because, as it turns out, you were not at fault. You were at fault for short-changing me by one photo on my last order, but I'm over that now.
Take a look at Example 1, above. This is a photo I took in Tupelo, Mississippi, at the tourist attraction known as Where Elvis Was Born. Or something like that. It's a '39 Plymouth and it was some car. I played around with the photo in Photoshop, adding a rough black edge to it. Now take a look at Example 2. I've lightened up the area that would print. Look what gets cut off! There goes my edging.......
It turns out the images that most digital cameras take are not ...I repeat, NOT... the image size needed to get you that perfect 4x6. And I learned this important nugget at, of all places, the online photo upload centre for a local drugstore chain. Explained in simple, easy English that made it perfectly clear. Go figure.
If your photograph is not cropped to the right size before being sent in for processing, you will lose a little off the top. And bottom. (Or sides, if you shoot your pictures that way.) Now, to be fair, for a lot of photos you might not notice and maybe not care either. But when you alter your photos, like I like to do, or even just crop out the area you like best, this is important stuff. And, silly me, I'd been cropping using Photoshop's Photo Ratio selection when using the cropping tool. Made sense to me. But it doesn't crop properly in order to give you an image that when processed won't be trimmed. Who knew? Not me. You need to use the other cropping choices, such as 4x6, 5x7, etc. Or, even simpler, use the rectangular marquee tool to make your selection, using -- here's the trick -- a 3:2 fixed aspect ratio. NOT 4:3, like I have always favoured. Man, I've just being doing it all wrong wrong wrong. It's 3:2 kiddos, 3:2.
And here's the neat part of this little trick. Take a look at the pixel dimensions of one of your photos; it might be something like 2048x1536. Example one, above, is 800x600. (When you hover over your photo while in Windows, it should show you the width and height properties; if not, you may have to actually right-click on the photo and choose Properties to have a look.) Now, take the big number and divide it by the smaller number. If you get 1.5, you're good to go and your photos should be developed properly. But if you get 1.3333333, then you either have to live with losing the top and bottom of your photo, or use an image editing program to crop it before you have it developed.
I understand that this may not be BREAKING NEWS for a lot of you. But for me, this is a big deal!
1 comment:
I was annoyed when it happened to me but finally figured out what I had to do. It was enlightening.
Post a Comment